

Today I want to talk about exciting new tool. Azure Quick Review (azqr) is a command-line interface (CLI) tool designed to analyze Azure resources, ensuring they adhere to Microsoft’s best practices and recommendations. By providing a detailed overview of your Azure environment, azqr helps identify non-compliant configurations and areas for improvement.
- Comprehensive Analysis: Evaluates Azure resources against best practices.
- Detailed Reporting: Generates reports highlighting compliance status and recommendations. Report can be Excel, CSV or JSON file.
- Support for Multiple Services: Covers a wide range of Azure services, including Virtual Machines, Storage Accounts, and more.
Report Structure
After executing a scan, azqr produces an Excel report with the following tabs:
Recommendations: Lists all best practice suggestions and improvement actions identified across your Azure environment.
- ImpactedResources: Shows the specific Azure resources that are affected by each recommendation.
- ResourceTypes: Provides a breakdown of scanned resources grouped by their type (e.g., VM, Storage Account).
- Inventory: A full list of all Azure resources that were scanned during the assessment, including basic metadata.
- Advisor: Captures Azure Advisor recommendations related to performance, cost, availability, and operational excellence.
- DefenderRecommendations: Contains security recommendations from Microsoft Defender for Cloud, highlighting vulnerabilities and risks.
- OutOfScope: Lists Azure resources that were excluded or unsupported in the current scan. Those are typically resources related to Azure Monitor, Metrics, etc.
- Defender: Displays the current configuration and coverage status of Microsoft Defender plans across your subscriptions and resources.
- Costs: Includes high-level cost insights and potential optimization opportunities for your Azure resources.
- PivotTable: A prebuilt Excel pivot table that helps you interactively filter, group, and analyze the findings across the dataset.
Installation
Azqr can be installed on various operating systems:
Windows
Using Winget:
1
winget install azqr
For Manual Installation, you can also download the lates executable:
1
2
$latest_azqr=$(iwr https://api.github.com/repos/Azure/azqr/releases/latest).content | convertfrom-json | Select-Object -ExpandProperty tag_name
iwr https://github.com/Azure/azqr/releases/download/$latest_azqr/azqr-windows-latest-amd64.exe -OutFile azqr.exe
macOS
Using Homebrew:
1
brew install azqr
Manual Installation: Download the latest release from the azqr GitHub repository.
Linux or Azure Cloud Shell
1
2
3
latest_azqr=$(curl -sL https://api.github.com/repos/Azure/azqr/releases/latest | jq -r ".tag_name" | cut -c1-)
wget https://github.com/Azure/azqr/releases/download/$latest_azqr/azqr-ubuntu-latest-amd64 -O azqr
chmod +x azqr
Note: Ensure that the jq utility is installed on your system to execute the above commands.
For detailed installation instructions, refer to the official azqr installation guide.
Usage
Required Permissions
Azqr requires at least Reader permissions over the Subscription or Management Group scope.
Authentication Methods
The best way for long term usage is to use a dedicated service principal. This will ensure continuous access and ability to run it without user context. For example in automation account or CI/CD for scheduled reports.
Create an Azure Service principal, and then configure the following environment variables:
- Service Principal:
AZURE_CLIENT_IDAZURE_CLIENT_SECRETAZURE_TENANT_ID
Here is how to do that in PowerShell:\
>$env:AZURE_CLIENT_ID = '<service-principal-client-id>' $env:AZURE_CLIENT_SECRET = '<service-principal-client-secret>' $env:AZURE_TENANT_ID = '<tenant-id>' Other methods of authentication:
- Azure Managed Identity
- Azure CLI: Note that using this method may result in slower scan performance. Azure CLI requires user authentication using az login
Running a Scan
To analyze your Azure resources, use the following commands:
Scan all resources in all subscriptions:
1
./azqr scan
Scan all resources in a specific management group:
1
./azqr scan --management-group-id <management_group_id>
Scan all resources in a specific subscription:
1
./azqr scan -s <subscription_id>
Scan a specific resource group in a subscription:
1
./azqr scan -s <subscription_id> -g <resource_group_name>
For a comprehensive list of commands and options, run:
1
./azqr -h
Filtering Recommendations and Resources
Azqr allows you to include or exclude specific subscriptions, resource groups, services, or recommendations by using a YAML configuration file. Create a file with the following structure:
1
2
3
4
5
6
7
8
9
10
11
12
13
14
15
16
17
azqr:
  include:
    subscriptions:
      - <subscription_id>
    resourceGroups:
      - /subscriptions/<subscription_id>/resourceGroups/<resource_group_name>
    resourceTypes:
      - <resource_type_abbreviation>
  exclude:
    subscriptions:
      - <subscription_id>
    resourceGroups:
      - /subscriptions/<subscription_id>/resourceGroups/<resource_group_name>
    services:
      - /subscriptions/<subscription_id>/resourceGroups/<resource_group_name>/providers/<service_provider>/<service_name>
    recommendations:
      - <recommendation_id>
Then, execute the scan with the --filters flag:
1
./azqr scan --filters <path_to_yaml_file>
Note: To obtain recommendation IDs, refer to the recommendations documentation.
Available Flags
AZQR includes a rich set of flags to customize your scans:
1
2
3
4
5
6
7
8
9
10
11
12
13
14
15
  -a, --advisor                      Scan Azure Advisor Recommendations (default true)
      --azqr                         Scan Azure Quick Review Recommendations (default true)
  -f, --azure-cli-credential         Force the use of Azure CLI Credential
  -c, --costs                        Scan Azure Costs (default true)
      --csv                          Create csv files
      --debug                        Set log level to debug
  -d, --defender                     Scan Defender Status (default true)
  -e, --filters string               Filters file (YAML format)
  -h, --help                         Help for scan
      --json                         Create json file
      --management-group-id string   Azure Management Group Id
  -m, --mask                         Mask the subscription id in the report (default true)
  -o, --output-name string           Output file name without extension
  -g, --resource-group string        Azure Resource Group (Use with --subscription-id)
  -s, --subscription-id string       Azure Subscription Id
Example: Disable Cost Scanning
If you want to exclude cost analysis (for example, if you don’t have billing permissions or want to speed up the scan), you can use the --costs=false flag:
1
./azqr scan -s <subscription_id> --costs=false
Example: Unmask Subscription IDs
By default, azqr obfuscates Subscription IDs in the output to protect sensitive information. To include full Subscription IDs in your AZQR reports, use:
1
./azqr scan -s <subscription_id> --mask=false
Here is how the report will look like:
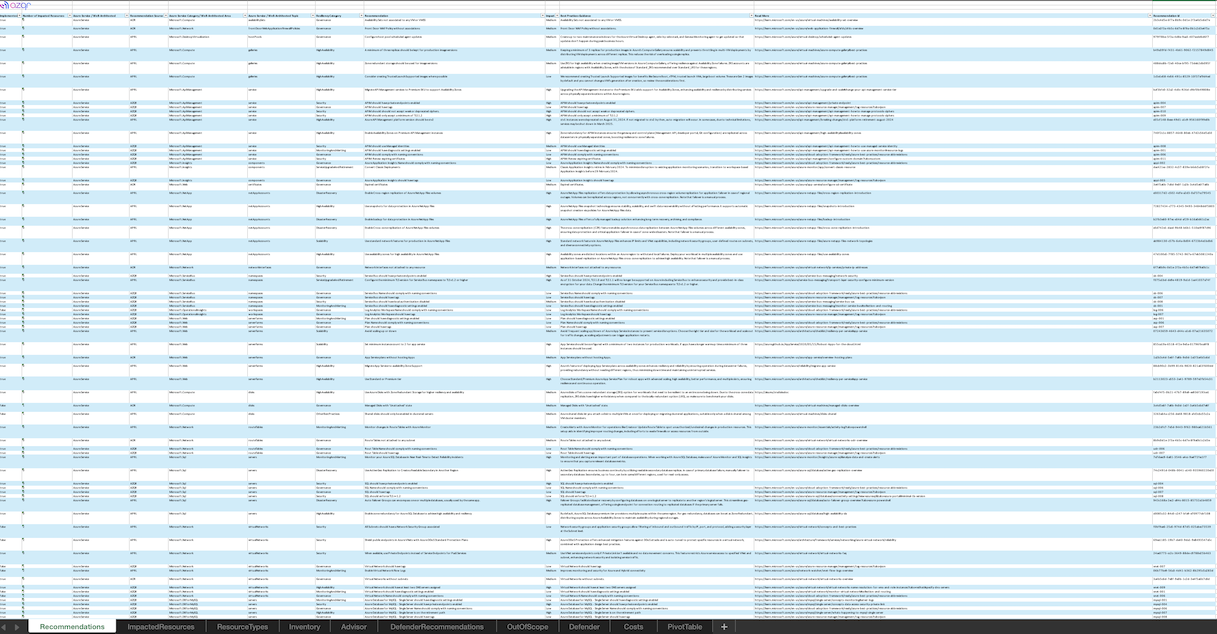
How to effectively use AZQR report
Running azqr in a large environment can feel overwhelming at first. With thousands of resources across multiple subscriptions, it’s hard to know where to begin. But don’t worry—azqr was built to scale, and with the right approach, it’s incredibly effective.
I’ve personally used azqr in an environment with 50 subscriptions and tens of thousands of resources, and I still found it extremely useful to identify issues, prioritize actions, and drive improvements across the environment.
Generate Different Report Types
Depending on how you plan to use the data, azqr can generate multiple types of reports:
- Excel Report (default) – Best for manual review:
1
./azqr scan -s <subscription_id>
This produces a single .xlsx file containing all the insights organized by tab.
- CSV and JSON Reports – Ideal for automation or custom reports:
1
./azqr scan -s <subscription_id> --csv --json
These formats allow integration with automation scripts, pipelines, or custom analytics tools.
- Power BI Report – Great for dashboards and collaboration:
1
./azqr pbi --template-path "c:\temp"
This produces an azqr.pbi template file. You can than use that as a template in Power BI Desktop or Power BI Service to build dashboards and share insights across teams. Use AZQR standard Excel file as a data source.
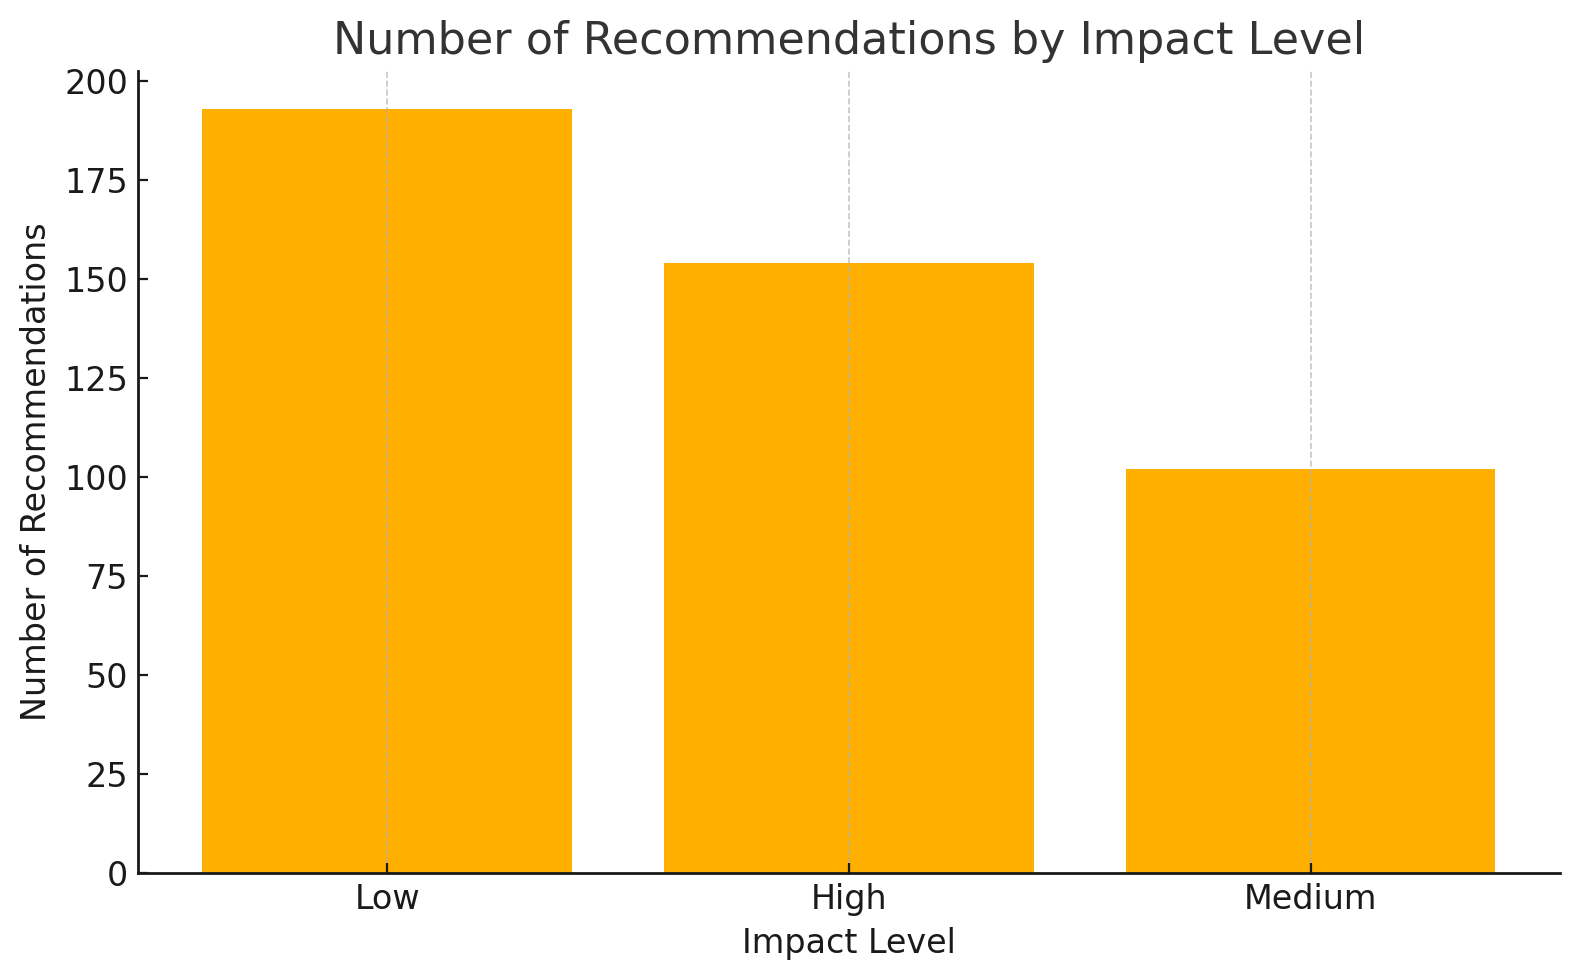
You can also create charts and dashboards directly in Excel file if needed:
Start with a Smart Review Order
To avoid overload, focus on what matters most:
| Step | Sheet | Why | What to Look For |
|---|---|---|---|
| 1 | Recommendations | Entry point to all issues | Prioritize by severity/priority/impact |
| 2 | ImpactedResources | Links issues to actual resources | Filter by ResourceType or ResourceGroup |
| 3 | DefenderRecommendations | Security first! | Critical security risks or Defender coverage gaps |
| 4 | Advisor | Built-in Azure advice | Look for performance, availability, and cost tips |
| 5 | ResourceTypes / Inventory | For context and validation | Helps understand the scope and plan grouping |
| 6 | OutOfScope | Optional | Ensure nothing important was skipped |
Exclude/Filter Known Issues
Use Excel filters or Power BI for dynamic filtering. Here’s how:
- In Recommendations, add a new column:
Status→ Mark as “Accepted”, “Ignored”, “Completed”, etc. - Use filters to exclude recommendations that:
- Are already remediated.
- Are not applicable (e.g., test environments).
- Fall under another team’s ownership.
You can also use your custom YAML file to exclude those from future scans.
Group and Assign Work
Group by Resource Group, Resource Type, or Owner Tag for practical triaging.
- Group in PivotTable or Excel by:
- Severity
- Service (ResourceType)
- Team (based on naming or tags)
Then assign recommendations to the appropriate owner/team.
Identify What’s Doable with Azure Policy
You can often fix or prevent issues using Azure Policy, especially those related to configuration drift, missing settings, or required tags.
Use azqr’s findings to identify which recommendations can be addressed with policy enforcement. This helps with:
- Automating future compliance.
- Standardizing resource configurations.
- Delegating fixes to platform engineering.
Using Azure Policy is a very effective way to resolve most of the discovered issues.
Tip: Create a column in the Excel workbook for “Can fix with Policy?” and mark Yes/No to track what’s automatable.
Examples of Issues You Can Fix with Azure Policy
- Missing Tags: Use built-in policies to require tags like
Owner,CostCenter, orEnvironmenton all resources. Automatically inherit tags from Resource Group if they don’t exist.- Policy example:
Require a tag on resources,Inherit tags from Resource Group if doesn't exist
- Policy example:
- Unencrypted Storage Accounts: Enforce encryption settings for storage accounts.
- Policy example:
Audit or Deny storage accounts without encryption
- Policy example:
- Public IPs: Block creation of public IP addresses where they are not needed.
- Policy example:
Deny public IP on NICs
- Policy example:
- Unrestricted NSG Rules: Audit or deny NSG rules that allow inbound traffic from any source.
- Policy example:
NSG should not allow internet traffic on any port
- Policy example:
- Unsupported SKUs or Regions: Prevent deployment of resources in non-approved regions or with unsupported SKUs.
- Policy example:
Allowed locationsorAllowed virtual machine SKUs
- Policy example:
- Defender Not Enabled: Use Azure Policy to audit or enforce Defender for Cloud plans for subscriptions or specific resources.
- Policy example:
Audit Microsoft Defender for Cloud plan settings
- Policy example:
- Backups, ASR and Monitoring: Use Azure Policy to automate Backups, ASR and Monitoring based on Tags.
These policies can be applied at the subscription or management group level, ensuring consistency across your Azure environment.
You can browse built-in policies or create custom ones using the Azure Policy portal.
Automate Remediation
Once you identified all the issues, you can automate the fixes. There are many ways to achieve this, depending if you are going to run the report on a schedule, or manually. For example if you save your AZQR output in CSV or JSON, you can start automating common remediation or reporting tasks using PowerShell. This can help scale your actions across multiple subscriptions or environments.
Common Automation Scenarios
- Generate reports for multiple subscriptions:
1
2
3
4
5
6
7
8
9
$subscriptions = @(
  "sub-1-guid",
  "sub-2-guid",
  "sub-3-guid"
)

foreach ($sub in $subscriptions) {
  ./azqr scan -s $sub --csv --output-name "azqr_report_$sub"
}
- Filter and export high-severity recommendations:
1
2
3
$recommendations = Import-Csv ".\azqr_report_sub-1-guid-Recommendations.csv"
$highSeverity = $recommendations | Where-Object { $_.Severity -eq "High" }
$highSeverity | Export-Csv ".\HighSeverity.csv" -NoTypeInformation
- Tag resources based on azqr findings:
1
2
3
4
5
6
7
8
9
$resources = Import-Csv ".\azqr_report_sub-1-guid-ImpactedResources.csv"
$grouped = $resources | Group-Object ResourceGroup

foreach ($group in $grouped) {
  $rgName = $group.Name
  foreach ($item in $group.Group) {
    az resource tag --ids $item.ResourceId --tags AuditFlag="NeedsReview"
  }
}
- Summarize recommendations per resource type:
1
2
3
$impacted = Import-Csv ".\azqr_report_sub-1-guid-ImpactedResources.csv"
$summary = $impacted | Group-Object ResourceType | Select-Object Name, @{Name="Count"; Expression={$_.Count}}
$summary | Export-Csv ".\SummaryByResourceType.csv" -NoTypeInformation
Tip: Schedule PowerShell scripts with Azure Automation, GitHub Actions, or Task Scheduler to run your scans and exports on a regular basis.
Final Thoughts
Azure Quick Review (azqr) is a powerful and lightweight tool that can help you gain visibility into your Azure environment quickly and effectively. I personally found it useful in a small subscription as well as when I was managing tens of thousands of resources across dozens of subscriptions. AZQR scales to meet your needs.
In this article I showed you how you can do manual reviews using Excel and fully automated remediation and reporting pipelines with PowerShell and Power BI. Start small, stay focused, and evolve your process as needed. Even if the first run feels overwhelming, use the tips above to break it down, prioritize, and get value fast. Over time, AZQR can become a routine part of your audits, security reviews, and optimization practices.
Thanks for reading and keep clouding around.
Vukasin Terzic