
As an Azure administrator, you likely spend a lot of time performing routine tasks related to Azure governance. These tasks can be time-consuming and repetitive, but they are critical to ensuring the security, compliance, and performance of your Azure environment. Fortunately, you can automate many of these tasks using PowerShell, and even expose your PowerShell scripts as a web API using Azure Function App.
Here are few examples of what you can do:
- Quickly check cost of Resource Group
- Check if resource name is compliant with your naming policy or generate resource name based on the resource type
- Resource management (Turn on/off, provision new resource …)
- Retrieve Monitor metrics for specific resource
- Clean or retrieve logs
- Rotate local passwords, storage keys, certificates …
- Edit Azure Policy Assignments
You can have these actions ready and available from your favorite shell, but you can also integrate them with a part of other workflows, or have them initiated via voice command if you wish (check this blog post: How to perform tasks in Microsoft Azure with Voice Assistants (Cortana, Alexa, Google, Siri
In this blog post, we will walk through the steps to create your own PowerShell API and use it for daily tasks related to Azure Governance.
Creating Azure Function App
The secret ingredience is Function App, we can use it to run and publish our PowerShell code.
To create it, navigate to the Azure Portal and click on “Create a resource” > “Compute” > “Function App”. Fill in the required details, such as the resource group, app name, and as a runtime stack select PowerShell.

Create PowerShell Function
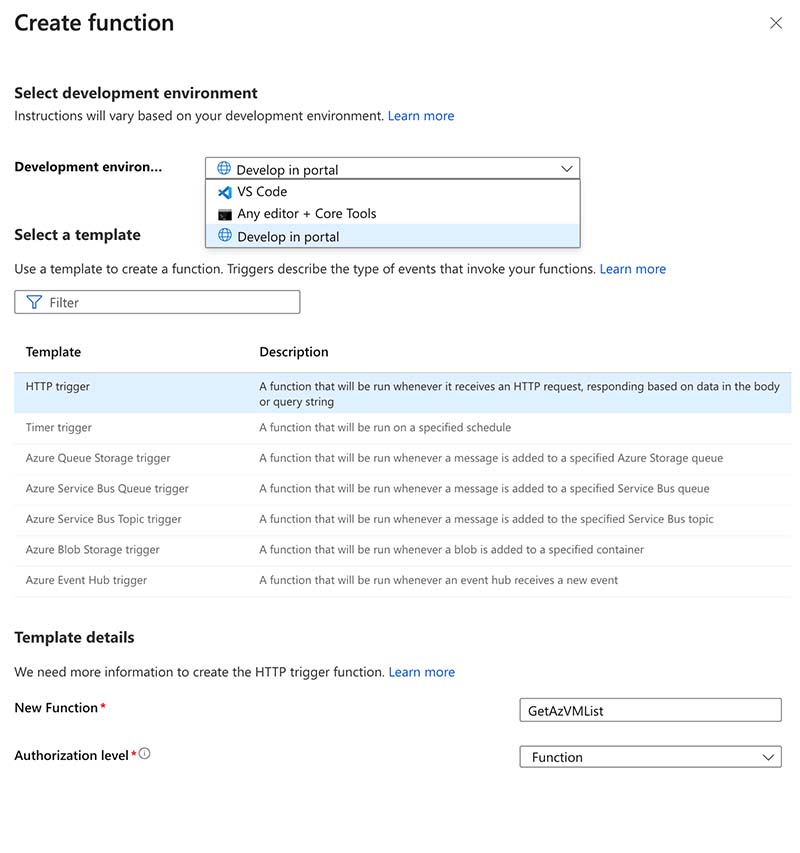
Once the function app is created, click on “Functions” and then click on the “+ New Function” button to create a new function.
To expose it as an HTTP API we need to add HTTP trigger. In this example I am creating a simple script to list all VMs in scope and therefore I gave it descriptive name.
For this example, I am going to edit my code in the browser, but for more compliated examples and production use, you can easily integrate this with VS Code or with GitHub.
Upload your PowerShell script
WHen you click on your newly created Function and go to Code + Test, you will see the run.ps1 file is already there.
We are going to keep the main structure of that file, and add our code:
Configure dependencies
Before we can run this code, we need to resolve a couple of things:
Install modules
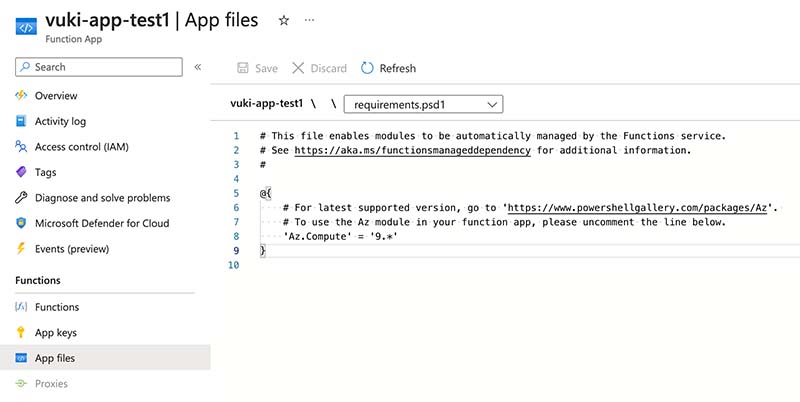
This may vary depending on your script. You will notice that my samle script is using AZ PowerShell module. Before being able to use it, we need to add it to our Function App.
This module can be uploaded as a file, or it can be added to the list of Requirements. To do that go to App Files, select requirements.psd1 an add your module there. While you are there also check your host.json and make sure that ‘managedDependency’ is ‘enabled’.
This might take a while before it works. You can easily check if the module is loaded by adding this to your script:
$(Get-Module -ListAvailable | Select-Object Name, Path)
Authenticate
Another thing that we need to do is to allow our Function App to authenticate to our Azure PowerShell.
This process is the same as with other Azure services. You can use Managed Identity, or read credentials from KeyVault. This can be configured directly in your script or in profile.ps1 file.
You will also need to select subscription and set context. You can loop all subscriptions, or select prefered subscription like this:
#Get Az Subscription and Set Context
$SubscriptionName = "Microsoft Azure Sponsorship"
Get-AzSubscription -SubscriptionName $SubscriptionName | Set-AzContext
Invoke your API
Now it is time to test our script. This simple script is expecting parameter RGName, so we can limit the list of VMs to that specific RG. We can also ignore the parameter and get the list of all VMs in subscription instead.
Easiest way to invoke the script is Invoke-WebRequest command.
#This URL does not contain parameter RGName:
$URLNoRGName = https://vuki-app-test1.azurewebsites.net/api/GetAzVMList?code=<yourCode>
Invoke-WebRequest $URLNoRGName


#This URL contains RG Name parameter, and script will check only for VMs in that RG:
$URLWithRGName = https://vuki-app-test1.azurewebsites.net/api/GetAzVMList?RGName=RG-Test-AzureAPI&code=<yourCode>
Invoke-WebRequest $URLWithRGName
This will return json output that should look something like this:
[
  {
    "ResourceGroupName": "RG-Test-AzureAPI",
    "Name": "VM-Test1"
  },
  {
    "ResourceGroupName": "RG-Test2",
    "Name": "VM-Test2"
  }
]
There are few more ways how and what can trigger this Function App, and that opens many ways to use it.
Here are a few ideas how to integrate this kind of APIs with our daily workflow:
- make longer running tasks to run on schedule, and then let your API work with collected/calculated results
- include it in your scripts or web apps
- call it on demand to perform tasks or get information. you can easily do it from any device, and you don’t need your modules or other dependencies installed
- integrate it with Stream Deck or Voice Assistants
Conclusion
By creating your own PowerShell API with Azure Function App is a powerful tool for automating Azure governance tasks and streamlining your workflow. By leveraging the power of PowerShell and Azure Function App’s HTTP trigger, you can easily expose your PowerShell scripts as a web API that can be called from anywhere, at any time. Whether you’re managing Azure policies, retrieving Azure resource data, or automating Azure workflows, a custom PowerShell API on Azure Function App can help you get the job done faster and more efficiently. With the step-by-step guide and code example provided in this article, you can start building your own custom PowerShell API for Azure governance today.
I hope this was helpful. Stay tuned for more script examples that I will be posting soon.
Vukasin Terzic