
Infrastructure as Code in Azure comes in many shapes. Some teams use ARM templates, others have fully embraced Bicep, and many rely on Terraform as their primary provisioning tool for multicloud environments. While these tools differ in syntax, workflow, and state management, the way we execute deployments around them is often inconsistent, ad-hoc, or tightly coupled to CI/CD pipelines.
This article focuses on a different angle.
Instead of comparing ARM, Bicep, and Terraform, or mixing them in a single deployment, we’ll look at PowerShell as a deployment orchestrator. A thin, reusable PowerShell layer can standardize how deployments are executed, regardless of the underlying IaC engine. The same technique can be applied whether you are deploying ARM templates, Bicep files, or Terraform configurations, individually and intentionally.
This might not be something you would like to adopt on a large scale accross your organization. But I like to think about PowerShell as an universal enablement tool. Tool that most of the people working on daily operations are familiar with.
The goal is not to replace native tooling, but to wrap it with a consistent execution pattern:
- predictable inputs
- pre-flight validation
- preview steps (what-if or plan)
- controlled execution
- structured output and logging
By the end of this article, you’ll have a clear, repeatable approach for running ARM, Bicep, and Terraform deployments from PowerShell in a way that works just as well locally as it does in automation pipelines.
Once you learn this technique, you will see how it will get handy very often.
The Core Pattern: PowerShell as a Deployment Orchestrator
Before looking at ARM, Bicep, or Terraform individually, it’s important to understand the core technique this article is built around.
The idea is simple:
PowerShell does not replace your IaC tool.
PowerShell standardizes how you execute it.
No matter which engine you use, every deployment usually follows the same logical steps:
- Load configuration
- Validate prerequisites
- Run a preview (if supported)
- Execute the deployment
- Capture outputs and results
PowerShell is exceptionally good at gluing these steps together in a clean, repeatable way.
A Minimal Deployment Flow
At a high level, every deployment we’ll run in this article will follow this flow:
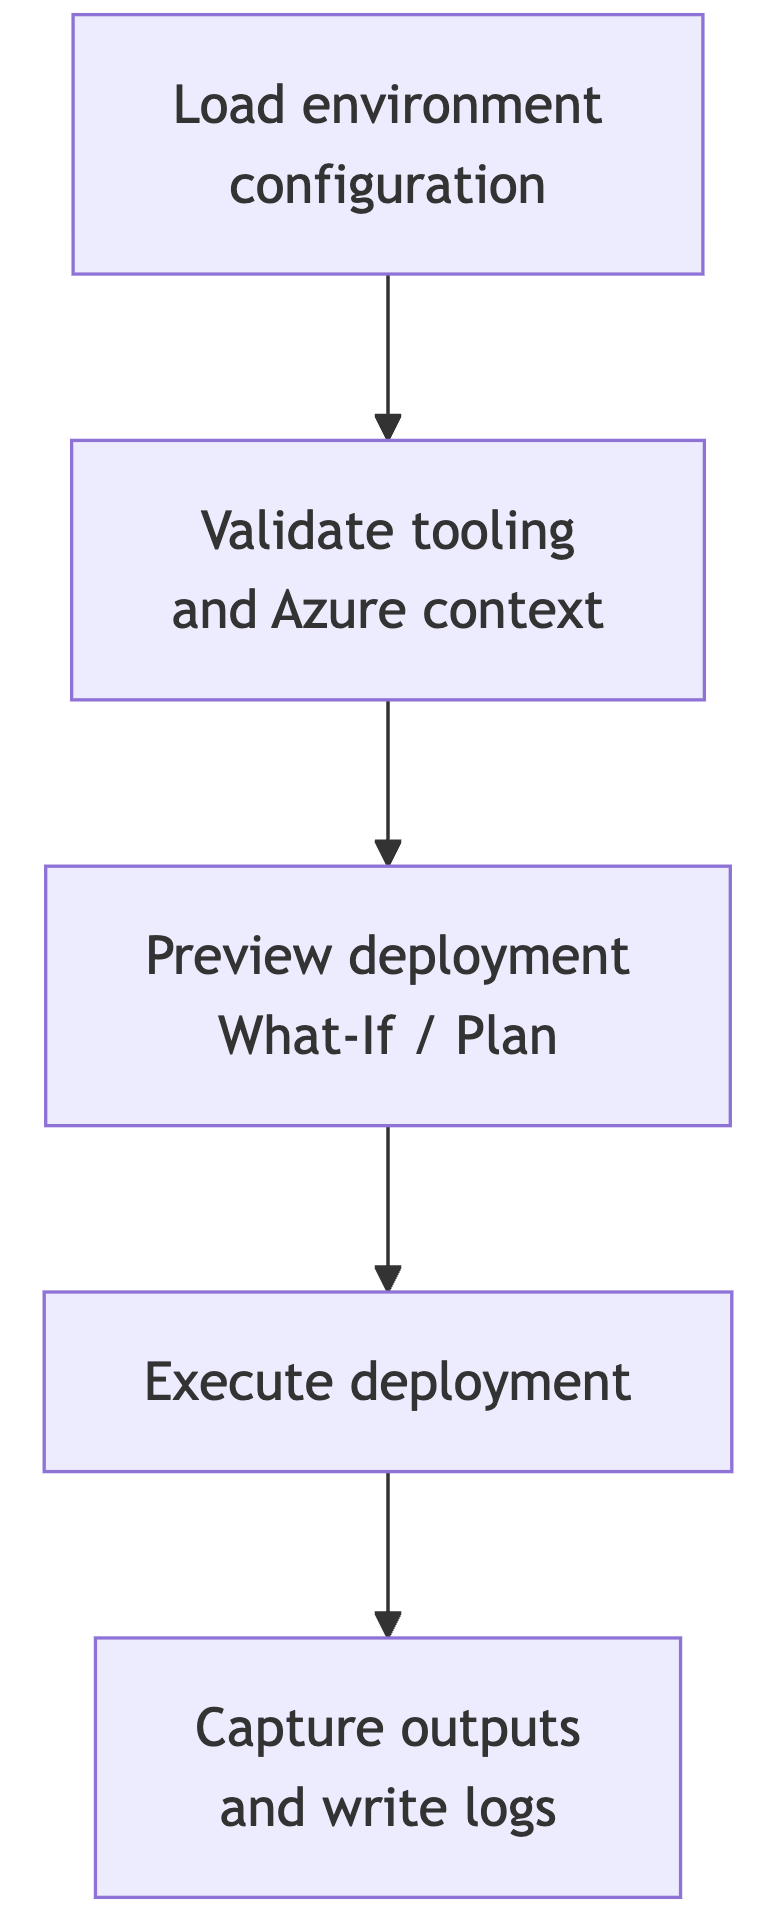
This flow stays the same whether the underlying command is:
New-AzResourceGroupDeploymentaz deployment group what-ifterraform plan/terraform apply
Standardizing Configuration
One of the biggest wins comes from separating configuration from code.
Instead of hardcoding subscription IDs, locations, or resource group names into scripts, we define them once per environment.
Example: Environment configuration
environments/dev.json
1
2
3
4
5
6
7
8
9
10
{
  "Environment": "dev",
  "SubscriptionId": "00000000-0000-0000-0000-000000000000",
  "Location": "westus",
  "ResourceGroupName": "rg-dev-deployments",
  "Tags": {
    "Environment": "dev",
    "Owner": "azureis.fun"
  }
}
The same structure can be reused for test.json, prod.json, or any other environment.
Loading Configuration in PowerShell
1
2
3
4
$envConfigPath = ".\environments\dev.json"
$Environment = Get-Content $envConfigPath -Raw | ConvertFrom-Json

Write-Host "Deploying to environment: $($Environment.Environment)"
This $Environment object will be passed into every deployment, regardless of the IaC tool used.
Pre-flight Checks (Do This Once, Reuse Everywhere)
Before running any deployment, we should validate:
- required tools are installed
- we are authenticated
- the correct subscription is selected
Checking Azure login and subscription
1
2
3
4
5
if (-not (Get-AzContext)) {
    throw "Not logged in to Azure. Run Connect-AzAccount first."
}

Set-AzContext -SubscriptionId $Environment.SubscriptionId
Checking required commands exist
1
2
3
4
5
6
7
8
9
10
11
12
13
14
function Assert-Command {
    param (
        [Parameter(Mandatory)]
        [string]$Name
    )

    if (-not (Get-Command $Name -ErrorAction SilentlyContinue)) {
        throw "Required command '$Name' was not found in PATH."
    }
}

Assert-Command -Name "az"
Assert-Command -Name "bicep"
Assert-Command -Name "terraform"
You can call Assert-Command conditionally depending on the deployment type.
Logging Patterns
Instead of relying only on console output, it’s useful to capture structured logs. In some of my previous articles and scripts I wrote about more complex logging patterns and I provided scripts for that. This time we will make it simple.
1
2
3
4
5
6
7
8
9
10
11
$LogFile = ".\logs\deploy-$($Environment.Environment)-$(Get-Date -Format yyyyMMdd-HHmmss).log"
New-Item -ItemType Directory -Path ".\logs" -Force | Out-Null

function Write-DeployLog {
    param (
        [string]$Message
    )

    $timestamp = Get-Date -Format "u"
    "$timestamp - $Message" | Tee-Object -FilePath $LogFile -Append
}
Usage:
1
2
Write-DeployLog "Starting deployment"
Write-DeployLog "Subscription: $($Environment.SubscriptionId)"
Wrapping External Commands Safely
When calling az or terraform, you should always check the exit code.
1
2
3
4
5
6
7
8
9
10
11
12
13
14
15
function Invoke-ExternalCommand {
    param (
        [Parameter(Mandatory)]
        [string]$Command,
        [Parameter(Mandatory)]
        [string]$Arguments
    )

    Write-DeployLog "Running: $Command $Arguments"
    & $Command $Arguments

    if ($LASTEXITCODE -ne 0) {
        throw "Command failed: $Command $Arguments"
    }
}
This prevents “silent failures” that look successful in pipelines.
Preparation Summary
Now that we prepared some basics, before we deploy anything, we already have:
- a consistent configuration model
- predictable logging
- safe command execution
- reusable pre-flight checks
Everything that follows (ARM, Bicep, Terraform) will plug into this exact structure.
ARM Template Deployment with PowerShell
ARM templates are still very common in Azure environments, especially for existing platforms, vendor-delivered solutions, or long-lived automation. PowerShell integrates with ARM natively, which makes orchestration straightforward.
What You Need for ARM
- ARM template file (
main.json) - ARM parameter file (
parameters.json) - Target resource group
Example ARM Folder Layout
1
2
3
4
infra/
└── arm/
├── main.json
└── parameters.json
If you don’t already have files, but you would like to follow with this article, here are some very simple files that you can use:
ARM main.json
1
2
3
4
5
6
7
8
9
10
11
12
13
14
15
16
17
18
19
20
21
22
23
24
25
26
27
28
29
30
31
32
33
34
35
36
37
38
39
40
41
42
43
44
45
46
47
48
49
50
51
52
53
54
{
  "$schema": "https://schema.management.azure.com/schemas/2019-04-01/deploymentTemplate.json#",
  "contentVersion": "1.0.0.0",
  "parameters": {
    "storageAccountName": {
      "type": "string",
      "metadata": {
        "description": "Name of the Storage Account"
      }
    },
    "location": {
      "type": "string",
      "defaultValue": "[resourceGroup().location]",
      "metadata": {
        "description": "Azure region for the Storage Account"
      }
    },
    "tags": {
      "type": "object",
      "defaultValue": {},
      "metadata": {
        "description": "Tags to apply to the Storage Account"
      }
    }
  },
  "resources": [
    {
      "type": "Microsoft.Storage/storageAccounts",
      "apiVersion": "2023-01-01",
      "name": "[parameters('storageAccountName')]",
      "location": "[parameters('location')]",
      "kind": "StorageV2",
      "sku": {
        "name": "Standard_LRS"
      },
      "tags": "[parameters('tags')]",
      "properties": {
        "accessTier": "Hot",
        "minimumTlsVersion": "TLS1_2",
        "supportsHttpsTrafficOnly": true
      }
    }
  ],
  "outputs": {
    "storageAccountName": {
      "type": "string",
      "value": "[parameters('storageAccountName')]"
    },
    "storageAccountId": {
      "type": "string",
      "value": "[resourceId('Microsoft.Storage/storageAccounts', parameters('storageAccountName'))]"
    }
  }
}
ARM parameters.json
1
2
3
4
5
6
7
8
9
10
11
12
13
14
15
16
17
18
19
20
{
  "$schema": "https://schema.management.azure.com/schemas/2019-04-01/deploymentParameters.json#",
  "contentVersion": "1.0.0.0",
  "parameters": {
    "storageAccountName": {
      "value": "staazureisfundemo001"
    },
    "location": {
      "value": "westus"
    },
    "tags": {
      "value": {
        "Environment": "dev",
        "DeployedBy": "PowerShell",
        "IaC": "ARM",
        "Owner": "azureis.fun"
      }
    }
  }
}
Preview: ARM What-If
Before deploying, we can run a what-if to understand what will change.
1
2
3
4
5
6
7
8
Write-DeployLog "Running ARM what-if"

New-AzResourceGroupDeployment `
    -ResourceGroupName $Environment.ResourceGroupName `
    -TemplateFile ".\infra\arm\main.json" `
    -TemplateParameterFile ".\infra\arm\parameters.json" `
    -WhatIf `
    -ErrorAction Stop
This step does not modify anything, but clearly shows:
- resources to be created
- resources to be modified
- resources to be deleted
Deploy: ARM Template
1
2
3
4
5
6
7
8
9
Write-DeployLog "Starting ARM deployment"

$deployment = New-AzResourceGroupDeployment `
    -Name "arm-deploy-$(Get-Date -Format yyyyMMddHHmmss)" `
    -ResourceGroupName $Environment.ResourceGroupName `
    -TemplateFile ".\infra\arm\main.json" `
    -TemplateParameterFile ".\infra\arm\parameters.json" `
    -Mode Incremental `
    -ErrorAction Stop
Capture ARM Outputs
1
2
3
if ($deployment.Outputs) {
    $deployment.Outputs | ConvertTo-Json -Depth 10 | Out-File ".\logs\arm-outputs.json"
}
This output file can later be consumed by:
- another script
- a pipeline step
- documentation or audit tooling
That was easy, wasn’t it? Now think about how this method can be used in your workflow, during the initial build process, or for Desired State Configuration or Recovery purposes.
Bicep Deployment with PowerShell
Next up, Bicep. Bicep is a domain-specific language that compiles to ARM, but offers much better readability and maintainability. From an orchestration perspective, Bicep behaves almost identically to ARM.
I assume you are already using it, but if not, it needs to be installed first.
Installing Bicep
Bicep can be installed and updated directly via Azure CLI. This works on Windows, macOS, and Linux and is ideal for automation.
1
2
3
4
5
6
7
8
9
10
11
# Ensure Azure CLI is installed first
if (-not (Get-Command az -ErrorAction SilentlyContinue)) {
    throw "Azure CLI is not installed."
}

# Install or update Bicep
az bicep install
az bicep upgrade

# Verify installation
az bicep version
What you need for Bicep
- Bicep file (main.bicep)
- Optional parameter file (parameters.json or inline parameters)
- Target resource group
Example Bicep Folder Layout
1
2
3
4
infra/
└── bicep/
    ├── main.bicep
    └── parameters.json
If you want to follow with sample code, here are the files for you:
Bicep main.bicep
1
2
3
4
5
6
7
8
9
10
11
12
13
14
15
16
17
18
19
20
21
param storageAccountName string
param location string = resourceGroup().location
param tags object = {}

resource storageAccount 'Microsoft.Storage/storageAccounts@2023-01-01' = {
  name: storageAccountName
  location: location
  kind: 'StorageV2'
  sku: {
    name: 'Standard_LRS'
  }
  tags: tags
  properties: {
    accessTier: 'Hot'
    minimumTlsVersion: 'TLS1_2'
    supportsHttpsTrafficOnly: true
  }
}

output storageAccountName string = storageAccount.name
output storageAccountId string = storageAccount.id
Bicep parameters.json
1
2
3
4
5
6
7
8
9
10
11
12
13
14
15
16
17
18
19
{
  "$schema": "https://schema.management.azure.com/schemas/2019-04-01/deploymentParameters.json#",
  "contentVersion": "1.0.0.0",
  "parameters": {
    "storageAccountName": {
      "value": "stbicepdemo001"
    },
    "location": {
      "value": "westeurope"
    },
    "tags": {
      "value": {
        "Environment": "dev",
        "DeployedBy": "PowerShell",
        "IaC": "Bicep"
      }
    }
  }
}
Preview: Bicep What-If
Because Bicep compiles to ARM, we can reuse the same what-if mechanism.
1
2
3
4
5
6
7
8
Write-DeployLog "Running Bicep what-if"

New-AzResourceGroupDeployment `
    -ResourceGroupName $Environment.ResourceGroupName `
    -TemplateFile ".\infra\bicep\main.bicep" `
    -TemplateParameterFile ".\infra\bicep\parameters.json" `
    -WhatIf `
    -ErrorAction Stop
Deploy: Bicep Template
1
2
3
4
5
6
7
8
9
Write-DeployLog "Starting Bicep deployment"

$deployment = New-AzResourceGroupDeployment `
    -Name "bicep-deploy-$(Get-Date -Format yyyyMMddHHmmss)" `
    -ResourceGroupName $Environment.ResourceGroupName `
    -TemplateFile ".\infra\bicep\main.bicep" `
    -TemplateParameterFile ".\infra\bicep\parameters.json" `
    -Mode Incremental `
    -ErrorAction Stop
Capture Bicep Outputs
Outputs work exactly the same way as ARM.
1
2
3
if ($deployment.Outputs) {
    $deployment.Outputs | ConvertTo-Json -Depth 10 | Out-File ".\logs\bicep-outputs.json"
}
Terraform Deployment with PowerShell
Terraform introduces a different model based on state and plans, but the orchestration technique remains the same: preview first, deploy second, capture outputs last.
Installing Terraform
You can install Terraform by downloading it or via WinGet/Choco/brew:
1
2
3
4
5
# Install Terraform using winget
winget install --id HashiCorp.Terraform --source winget --accept-source-agreements --accept-package-agreements

# Verify installation
terraform version
What You Need for Terraform
- Terraform working directory
- Backend configuration
- Variable file (*.tfvars)
Example Terraform Folder Layout
1
2
3
4
5
6
infra/
└── terraform/
    ├── main.tf
    ├── variables.tf
    ├── backend.tf
    └── dev.tfvars
Terraform providers.tf
1
2
3
4
5
6
7
8
9
10
11
12
13
14
terraform {
  required_version = ">= 1.5.0"

  required_providers {
    azurerm = {
      source  = "hashicorp/azurerm"
      version = "~> 3.100"
    }
  }
}

provider "azurerm" {
  features {}
}
Terraform variables.tf
1
2
3
4
5
6
7
8
9
10
11
12
13
14
15
16
17
18
19
20
variable "resource_group_name" {
  description = "Target resource group name"
  type        = string
}

variable "location" {
  description = "Azure region"
  type        = string
}

variable "storage_account_name" {
  description = "Name of the Storage Account"
  type        = string
}

variable "tags" {
  description = "Tags applied to resources"
  type        = map(string)
  default     = {}
}
Terraform main.tf
1
2
3
4
5
6
7
8
9
10
11
12
13
resource "azurerm_storage_account" "this" {
  name                     = var.storage_account_name
  resource_group_name      = var.resource_group_name
  location                 = var.location
  account_tier             = "Standard"
  account_replication_type = "LRS"

  access_tier               = "Hot"
  min_tls_version           = "TLS1_2"
  enable_https_traffic_only = true

  tags = var.tags
}
Terraform outputs.tf
1
2
3
4
5
6
7
output "storage_account_name" {
  value = azurerm_storage_account.this.name
}

output "storage_account_id" {
  value = azurerm_storage_account.this.id
}
Initialize Terraform
Initialization should be idempotent and safe to rerun.
1
2
3
4
Push-Location ".\infra\terraform"

Write-DeployLog "Initializing Terraform"
Invoke-ExternalCommand -Command "terraform" -Arguments "init -input=false"
Preview: Terraform Plan
1
2
3
4
5
Write-DeployLog "Running Terraform plan"

Invoke-ExternalCommand `
    -Command "terraform" `
    -Arguments "plan -var-file=dev.tfvars -out=tfplan"
At this point you have:
- a human-readable plan
- a binary plan file (tfplan) that guarantees what will be applied
Deploy: Terraform Apply
1
2
3
4
5
Write-DeployLog "Applying Terraform plan"

Invoke-ExternalCommand `
    -Command "terraform" `
    -Arguments "apply -input=false tfplan"
Capture Terraform Outputs
1
2
3
Write-DeployLog "Capturing Terraform outputs"

terraform output -json | Out-File "..\..\logs\terraform-outputs.json"
Conclusion
ARM, Bicep, and Terraform each bring their own strengths, syntax, and workflows, but the way deployments are executed does not need to change with every tool. By introducing a thin PowerShell orchestration layer, you can standardize how infrastructure is deployed without abstracting away or hiding the native tooling.
Throughout this article, we used the same execution pattern for all three technologies:
- load environment configuration
- validate prerequisites and context
- preview changes
- deploy
- capture outputs and logs
The underlying engine changed, but the orchestration did not.
This approach keeps deployments predictable and transparent, works equally well from a developer’s laptop or a CI/CD pipeline, and allows teams to evolve their Infrastructure as Code strategy without rewriting how deployments are run. Whether you are working with ARM templates, adopting Bicep, or using Terraform, PowerShell becomes a consistent entry point that enforces discipline without adding unnecessary complexity.
If you take only one thing away from this article, let it be this:
treat deployments as an execution problem, not a tooling problem.
Once the execution is standardized, the choice of ARM, Bicep, or Terraform becomes exactly what it should be—an implementation detail.
Understanding this technique also helps with one-off deployments, where we have a template that we want to deploy once.
I hope this was useful. Thank you for reading to the end. Stay curious and keep clouding around.
Vukasin Terzic